January 22, 2013

Lemon Blueberry Bundt Cake

Hey y'all! It would appear it has been well over a year since I wrote anything up. Sorry about that! In 2011 I finally got a job that occupied all of my brain space, and in 2012 I followed it up with the purchase of our first house and the creation of our first baby (due June 2013). So it was a little busy! But now that the house has been (somewhat) repaired and the nausea has (mostly) subsided, I wanted to get back in the kitchen. I got an extra kick in the pants from our lemon tree. We moved to Orange, California, original home of the Sunkist Orchards and the provider of much delicious fruit. While our 1954 ranch-style home is on the small side, it has a lovely back yard! We are in the process of figuring out how to maximize the vegetable garden and the orchard space. While it will be a few years before our apples and peaches come in, we have mature citrus trees that produce massive amounts of fruit every few months - namely, Valencia oranges (a subject for another day) and this week's theme fruit, LEMONS! You can see how many we have to kill off below.
This week, I'm trying to use lemons in all of our dinners and some extra desserts. I could tell you about the Lemon Chicken Orzo Soup I made tonight, but let's face it, cake is way more exciting. I began the week with my first-ever blog post, Lemon Yogurt Cake. But I wanted a better-looking version with a bit more pizzazz for my husband to take to his (brand new) job this week. So I found this one! As my friends and family have referred to me as Martha Stewart for many years, it should hardly come as a shock that her recipes appeal to me. This one appealed to me precisely because a) it looked nice without being complicated and b) it had a lot in common with the aforementioned Lemon Yogurt Cake! Yogurt in cakes is pretty much always a good idea. I made a chocolate yogurt cake with chocolate yogurt frosting last week - still good. The texture of these cakes cannot be beat - they are moist without being heavy or buttery. Plus, I can pretend they're healthy, and I tend to have yogurt around (versus something like sour cream, as this recipe originally called for) for just that reason.
So I gave it a shot, and found that indeed, it was much the same cake - but in a bundt pan. :) I did a little re-write to create fewer dishes (hate dishes), but that's about it. I think this would also be GREAT with raspberries. If you serve it early in the day, at a brunch or lunch, it's fine as is...sprinkle a little powdered sugar for effect. If you want it a little sweeter, make a simple glaze of powdered sugar and lemon juice, poke a few holes in the cake, and drizzle away. Or, if you are pregnant and in need of mass amounts of sugar, slather it with lemon curd. That oughta do it. :)

Lemon Blueberry Bundt Cake
From Martha Stewart's Recipe

Ingredients
2 1/2 cups all-purpose flour
2 teaspoons baking powder
1 cup (2 sticks) unsalted butter, room temperature
1 cup packed brown sugar
1 cup granulated sugar
4 large eggs
1 teaspoon vanilla extract
1 cup plain Greek yogurt
2 cups blueberries
2-3 tablespoons grated lemon zest (for me, 7 lemons)
 Nonstick cooking spray, for pan
Bundt pan

Preheat oven to 350 degrees. Zest lemons via grater or microplane in a bowl big enough to fit 2 cups of blueberries.
Cream sugars, butter, and lemon zest in your mixer. It will look like the first stage of chocolate chip cookie dough.
Add eggs one at a time, scraping down after the second egg. Add vanilla. You could also add the juice of a lemon or two here, but I don't know how much difference it would make. In the bowl that once held your lemon zest, sift together baking powder and flour. Add alternately with the cup of Greek yogurt - i.e., flour, yogurt, flour, yogurt, flour.
A little bit of flour will stick to the bottom of the bowl - this is perfect to use to dust the blueberries, which will help keep them suspended in the batter.
Empty dusted berries into the batter, and fold in. TO CLARIFY: folding means taking a rubber spatula and bringing it all around the bowl, and then over the top of the berries...then use the spatula to cut in half across the bowl, and again fold over the top. Every time, ensure you "drag" the bottom of the bowl. Spray your bundt pan - including the center piece - and empty batter in, evening it out along the top. Throw that bad boy in the oven and leave it there for 60 minutes.
When a butter knife inserted in the cake's highest point come out clean, it is ready. Blueberry residue is OK. Let cool in the pan on a rack for 20 minutes, then turn out and cool completely. If desired, even out the bottom by using a serrated bread knife to create a flat surface. Eat warm if you can, with some hot coffee and good company. :)

May 17, 2011

Mexican Chocolate Cakes with Tequila Caramel Sauce


I have a cookbook collection that may rival some professional chefs'. I have cookbooks on Indian food, picnic food, French food, food for dinner parties, finger food…the list goes on. In fact, there is an entire shelf in my spare room, by which I mean shelving unit with three full shelves, dedicated to cookbooks. And I recently acquired a new one from a friend in celebration of the almost unspeakable birthday. It is my new favorite, and it is titled Booze Cakes. You’ll be seeing recipes from this invaluable resource frequently, I’m sure.

The recipe below is pretty simple, but does go a LOT faster if you have a stand mixer. I can beat egg whites to stiff peaks without, but it takes awhile and requires a reasonable amount of endurance. Nevertheless, it’s doable. I made two batches, one by greasing and flouring the tins, one with liners. I know the liners are less cute…use them anyway, I could not get the first batch out (and was therefore forced to eat them straight from the pan). I would also keep a close eye on them after about 10 minutes…they are better underdone than overdone.

The ultimate keeper of this recipe, if you use nothing else, is the creative and amazing idea of combining tequila and caramel. Do this. Like, now. The recipe calls for cajeta, a Mexican caramel, but I didn’t have that on hand. Trader Joe’s Fleur de Sel caramel worked just fine. I put it on the cakes when they were warm, which meant that they absorbed the sauce (it does turn out thin) and then tasted like a strong, sweet margarita (this is better than it sounds, I swear). They keep fine for several days in the fridge, but microwave them for 15 seconds before inhaling them.

Salud!

Mexican Chocolate Cakes with Tequila Caramel Sauce
from Booze Cakes, by Krystina Castella and Terry Lee Stone

Ingredients:

1 stick unsalted butter
½ cup sugar, divided
9 oz. semisweet chocolate chips
1 tsp. vanilla extract
1 Tbsp. Kahlua
2 eggs, separated

¼ cup tequila
¼ cup cajeta or caramel sauce


Directions:
Preheat oven to 425 degrees and line a 12-cup muffin pan with cupcake liners.

In a saucepan over low heat, melt ¼ cup of the sugar with the stick of butter, trying very hard not to let it boil. Stir in chocolate chips until they have melted, then remove from heat and add vanilla.


In a medium mixing bowl, beat the 2 egg yolks and the remaining ¼ cup of sugar until they are sunshine-colored. Ruin this by beating in the Kahlua (worth it in the long run). SLOWLY, drizzle a spoonful of the chocolate mixture into the eggs, whisking constantly. Repeat until one third of the chocolate mixture has been incorporated, then slowly add the remainder until the chocolate and egg mixtures have been fully incorporated.


In the bowl of your stand mixer, beat the 2 egg whites until stiff peaks form (or do it by hand and forego your push-ups that day). Fold the egg whites not the chocolate mixture, using a rubber spatula and circular motion…DO NOT overmix. Try not to smash the foaminess too much, either.


Divide batter among 12 cupcake cups and bake 12-15 minutes. It’s good raw, so you really can’t go wrong.


Combine tequila and caramel sauce in a pyrex measuring cup and microwave 1-2 minutes or until melted, then stir to combine. Spoon over warm cakes.


Let them cool for one hour in the pan, so that they solidify a bit, then finish cooling on a wire rack. Serve with spoons, as they are super moist, full of tequila, and unlikely to stand up to liner-peeling.

Drink remaining caramel sauce, if there is any. :)

May 5, 2011

Chocolate Whiskey Cake


It has come to my attention that many people do not care for whiskey. It's not a fun alcohol that gets mixed into fruity drinks, nor is it a clean taste that inevitably is eclipsed by the tonic and lime it's served with. It's darker and smokier, and more real. I think there's something wrong with the people who avoid whiskey. I think that they don't like real drinking.

I, of course, love whiskey. It is fantastic stuff, very nearly as good as scotch. So when, in the course of looking for another cake to take up an afternoon of my time, I found a cake that contained almost nothing but chocolate, whiskey, and coffee (my three favorite things), I simply had to try it. I was worried that it wouldn't appeal to "those people", those cowardly rum and tequila drinkers. But as it turns out I was wrong. Even with the substantial amount of liquor I used (after all, I was the one making the cake, and I saw no reason to cater to the preferences of others), everyone thought it was well-balanced..."just a hint" of whiskey coming through. The cake is not overly sweet, keeps well (and supposedly improves with age, if it lasts that long), and can be made in under 10 minutes. It's perfect. And your kitchen will smell absolutely divine.

You can, of course, change the liquor to something else (scotch would be amazing, if expensive, in this recipe; or you could use Disaronno or rum or anything a bit sweeter). You can opt for the lower level of whiskey, as well, if you're worried about overpowering the wussy ones. I would suggest using high quality cocoa powder, even though I didn't. The cake is very rich and moist on it's own, but good cocoa will bump up the chocolate flavor. If you're worried about picky people, glaze it or frost it, but the cake does nicely without. A dollop of whipped cream is a good thing on the side...I expect it would be a better thing if it was flavored with brown sugar, or better yet, more whiskey!

Try this one. It's easy and it's fantastic. And it's alcoholic. Excellent for strenuous days, breakups, and really anything else. Enjoy this perfect vice.


Chocolate Whiskey Cake
Stolen from Gourmet, September 2005

Ingredients:
1 cup unsweetened cocoa powder, plus extra for dusting pan
1 1/2 cups strong freshly brewed coffee
1/2 cup whiskey (I used Maker's Mark, but whatever you have will do)
(NOTE: you can also use 1 cup coffee, and 1 cup whiskey, as I did)
2 sticks (1 cup) unsalted butter, cut into 1-inch pieces
2 cups sugar
2 cups all-purpose flour
1 1/4 teaspoons baking soda
2 large eggs
1 teaspoon vanilla

Whipped cream (if desired)

Glaze (if desired) of one cup chocolate chips, melted, and mixed with 1 tsp. vegetable oil

Directions:


Preheat oven to 325°F. Butter bundt pan well or spray with cooking spray. Sift a 1/8 cup of cocoa powder into the pan - if you don't sift it, it is REALLY hard to get the pan covered. Knock excess powder around the sides until the inside of the pan is a highly unattractive black powdery mess.


Heat coffee, whiskey, butter, and 1 cup cocoa powder in a saucepan over moderate heat, whisking, until butter is melted. Try not to let it boil - you'd hate to lose extra alcohol content. Remove from heat, then add sugar and whisk until dissolved, about 1 minute. Transfer mixture to a large bowl and cool 10 minutes.


While chocolate mixture cools, mix flour and baking soda in a small bowl - sift if there are large clumps. Whisk together eggs and vanilla in a slightly larger bowl.


I find it advisable to then temper the eggs mixture by adding small spoonfuls of the warmer chocolate mixture and whisking it into the eggs thoroughly. When the eggs are a nice dark brown color, SLOWLY poor them back into the chocolate mixture, whisking constantly. if you skip this step and the chocolate is too hot, you'll have chocolate plus scrambled eggs, which is less tasty (I assume). Add flour mixture and whisk until just combined (batter will be thin and bubbly). Pour batter into bundt pan and bake until a thin knife inserted in center comes out clean, 40 to 60 minutes depending on your oven.


Cook in pan, on rack, for 45 minutes. DO NOT attack the warm cake, even though it will smell truly divine. After 45 minutes, turn it out of the pan onto the rack to cool completely. Resist the temptation to remove large pieces of cake with your fingers and shove them into your mouth - it totally ruins the presentation.


It's good warm, but if you choose to use the glaze you must wait until it cools, then glaze it, throw some whipped cream on it, and commence eating the entire thing yourself.

You're welcome.


May 4, 2011

Brown Sugar Birthday Cake with Blackberries


It was my birthday this week. I say this not to extract gifts (which will of course be accepted graciously), but because I started trying to think of acceptable birthday cake contenders several weeks in advance. And I just didn’t have many. Traditionally, I’ve been a chocolate cake with chocolate frosting kind of girl. However, my tastes have expanded to more exotic flavors (which my husband is forced to eat on my birthday), and sadly the temperature on my birthday was a balmy 87 degrees. Not really the time for chocolateyness. So I decided to do something with fruit in it, and looked around until I found this recipe. I decided it counted.

Do not mistake me - this is not a fruity cake. This is the sweetest cake (and I mean that is the sucrose sense of the word) you will ever eat. It improved after a few days, so I might suggest making the cake two days in advance, then assembling and frosting day-of. It tastes not unlike a chocolate chip cookie that a) has no chocolate and b) was made into a cake. I liked it, as did my co-workers, though my husband (not a brown sugar fan) was less thrilled. Next time, I’d take out some of the sugar and add more berries to cut the sweetness, both changes reflected below. If you worry about sweetness, cut down the amount of frosting, too - I am incapable of skimping on frosting. The cake was BEAUTIFUL, a fun way to feature summer berries without pink frosting or shortcakes, and a way to indulge my deep and abiding love of brown sugar. I’m sure I’ll be messing with it in the future, but in the meantime, give this a try and let me know what you think! I’ll be here, singing “Happy Birthday” to myself. :)

Brown Sugar Birthday Cake with Blackberries
Gourmet Magazine, September 2006

Ingredients

Cake:
2/3 cup walnuts (2 oz)
½ -1 cup granulated sugar, divided
2 sticks (1 cup) unsalted butter, softened
2 cups all-purpose flour
1 1/4 teaspoons baking soda
1 cup well-shaken buttermilk
1 teaspoon finely grated fresh orange zest
2 tablespoons fresh orange juice
1 1/2 teaspoons vanilla
1 cup packed light brown sugar
2 large egg

Frosting:
1 cup brown sugar
8 oz cream cheese, softened
1 cup powdered sugar or more (thicken to taste)

Berries:
4 small clamshells blackberries
½ cup blackberry jam

Directions

To Make Cakes:

Put oven racks the middle of the oven and preheat oven to 350°F.

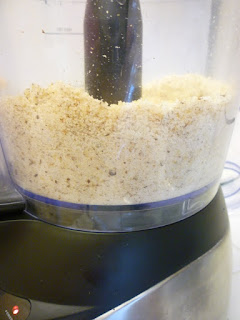
In the food processor, pulse walnuts and ½ cup white sugar until finely ground. Do not, however, let it become walnut butter.


Grease 2 cake pans (8-9” each) and put a rounded ⅓ cup of the walnut mixture into the bottom. Use it to “flour” the pan, tilting it to cover the bottom and sides. Shake slightly to spread excess evenly along the bottom. Reserve any addition mixture.


In one medium bowl, sift together flour and baking soda.

In a slightly smaller bowl, zest an orange and juice it. Add buttermilk and vanilla.


In the bowl of your stand mixer, cream butter, brown sugar, and additional ½ cup granulated sugar (I may omit this - the cake is plenty sweet already). It should be pale brown and slightly fluffy, not unlike the first stage of chocolate chip cookie making.

Add eggs, beating well after each addition.

On slow speed, add some flour mixture, then some liquid mixture, alternating 3-4 times before ending with flour.


When batter is smooth (it will be thick), spoon into cake pans evenly. Do not upset the walnut mixture more than necessary.

Bake until skewer comes out clean, about 30 minutes. It is worth switching pan positions halfway through, mine rose unevenly (they can be matched up to make an even cake, don’t worry!).

Cool in pans on racks 15 minutes. Invert racks over pans, then flip cakes onto racks to cool completely, about 1 hour. Wash berries and leave on paper towels to dry completely while cake cools.


Cake layers can be baked 2 days ahead and kept, wrapped in plastic, at room temperature.

To Make Frosting:

Cream cream cheese and brown sugar in stand mixer. Add powdered sugar until frosting is the desired consistency.

To Assemble Cake:
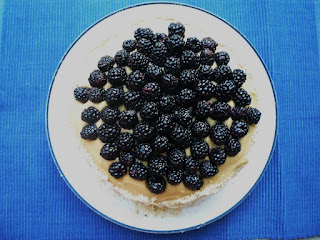
Place one layer, walnut side up, on the platter of your choice. Feel free to use that trick where scraps of max paper are placed beneath and then pulled out post-frosting...I was too lazy.

Microwave jam for 10 seconds, then spread in a thins layer on cake. Carefully place half of the blackberries on top, using the smallest berries. If all berries are on the large side, gather up half in a bowl and smash slightly with a fork, then spread the crushed berries on the cake. Leave 1 inch along the edges.


Line up the other half of the cake and place atop the berries, walnut side down (note: if your cakes rose unevenly, simply line the high side of one layer up with the low side of another layer. Presto!). Press down slightly to ensure berries are firmly sealed in.

Frost top of cake first, then sides (fun yet messy). If you have remaining walnut mixture, press gently into sides of cake. Arrange remaining blackberries attractively on top, and then go impress people.

March 17, 2011

Irish Car Bomb Cupcakes


Hello again, fellow foodies! I would love to say that my long absence from this blog meant that I had been eating a nutritious and well-balanced diet. Sadly, that is not the case. Between the job, the puppy, and the holidays, I just did not have time for my usual baking (aside from Christmas cookies, the recipes for which my mother keeps in a safe somewhere). But never fear! I have returned just in time for everyone's favorite Irish holiday.

I am not Irish, sad to say. I will admit that I left the house on March 17 wearing blue instead of green, with nary a thought of leprechauns. Thankfully, the day of drinking coincided with my usual Thursday beer sampling with my friend Max, so I was spared the trouble of trying to find a spot to sit at any of the local pubs. Instead I got to go home and wait for him to get off work. So since I had a few hours, I decided to make an appropriate St. Patrick's Day dessert - Irish Car Bomb Cupcakes!

They probably won't get you buzzed, but they are delicious. You can make them sweeter by using milk chocolate in the ganache and porter in the cake batter, and increasing the amount of cream cheese frosting. I prefer my chocolate bitter, so I used dark and unsweetened chocolate for the ganache (and there was lots leftover!), and a tangy stout from England (sorry, it's what I had on hand...Max and I really didn't need to keep extra Guinness around the house). Most recipes called for sour cream, but as usual I substituted Greek yogurt, which also decreased the sweetness somewhat. Don't like alcohol? Don't worry, you can't taste it in the cake, and there's only a hint of that whiskey flavor in the frostings. That being said, you may want to be cautious if sharing these at the office...

Otherwise, these little lovelies provide a perfectly good opportunity to celebrate the delectable and the delirious - the cupcakes are much safer than the cocktail.

Irish Car Bomb Cupcakes

Chocolate Stout Cupcakes (adapted from Dave Lieberman’s recipe)
2 large eggs, at room temperature
1/2 cup thick yogurt, at room temperature
6 oz. dark stout (3/4 cup) at room temperature (I used an Oatmeal Stout)
2 t. vanilla extract
1/2 cup dutch processed cocoa powder
1 cup sugar
1 1/4 cups all purpose flour
1 teaspoon baking soda
6 tablespoons butter, melted

1. Preheat oven to 350 degrees.
2. Line a cupcake pan with cupcake papers or spray tins liberally with canola oil.
3. Melt butter and set aside to cool .
4. In a large bowl, mix eggs, yogurt, beer and vanilla until combined.


5. Sift all the dry ingredients together (cocoa powder, sugar, flour, baking soda) into a separate bowl.


6. Add about a third of the flour mixture into the wet ingredients and blend well. Add the rest of the flour mixture, a cup at a time, mixing well after each addition. When it’s blended but still a bit bumpy, add the butter and stir until smooth.


7. Pour batter into the twelve cups, filling each only about 3/4 full (I had enough for one more cupcake leftover – baked it as a cake in a ramekin).


8. Bake on center rack of the preheated 350 degree oven and for 20 minutes, or until a toothpick comes out clean.
9. Let cool in tin on a wire rack for ten minutes then remove cupcakes from pan and let them cool completely on rack.


Whiskey Ganache (based on a basic ganache recipe at epicurious.com)
¾ cup heavy cream
8 oz. chocolate (I used a combination of dark chcolate, semi-sweet chocolate, and unsweetened chocolate)
1 oz. whiskey

In a heavy saucepan, boil heavy cream. Turn off the heat. Add chopped chocolate pieces and let it rest until melted. Use a rubber spatula to stir the mixture until all the pieces are melted. Let it cool until it comes to the consistency of a thin frosting.

Dip cupcake tops (cool, please) into the ganache and swirl around. Pick straight up, invert, and place back on wire rack.

Alternatively (and I may do this next time), if you want the chocolate flavor to be a little stronger, let the ganache cool until it comes to a spreadable consistency, then spread a nice thick layer on each.

Either way, let the cupcakes cool for 5-10 minutes so that the ganache hardens somewhat.


Bailey’s Cream Cheese Frosting
4 oz. cream cheese
1 lb. box powdered sugar
1 oz. Bailey’s Irish Cream liquor

Microwave cream cheese for 20-30 seconds and place in bowl of stand mixer. Whip until creamy, then add Bailey’s. Whip for 30 seconds, then scrape down sides of bowl. Turn mixer back on to medium speed and slowly add powdered sugar until frosting reaches desired consistency. To pipe, scoop frosting into sandwich bag, cut a small hole in the corner, and squeeze gently over the ganache-topped cupcake. If you're design inclined, cut a slightly smaller hole and go crazy...as you can see, my creativity is not of a visual nature...


Consume...preferably with Guinness, and while wearing something green. Sláinte

October 31, 2010

Treacle Tart


Some of you may be aware that there is a new movie coming out – the long awaited finale of the Harry Potter series (part one). As a big fan of J.K. Rowling’s work, I have been gearing up appropriately by re-watching all the movies and re-reading all the books. It’s actually a ritual I go through around the holidays every year, anyway – Hogwarts always remind me of Christmas. But this time I’m celebrating the release for a solid six weeks with friends, as we all watch the films on my giant TV and share our latest baked goods.

My goal every time a movie comes out is to theme the food – I’m a big fan of themes (obviously). Sadly, while Rowling mentions all kinds of exciting delicacies in her books, I just don’t know how to make any of them. What exactly is in a cauldron cake? How does one juice a pumpkin appropriately? And frankly, who wants to eat steak and kidney pie? Short of buying the exorbitantly expensive Bertie Botts’ Every Flavor Beans, it becomes difficult to really take advantage of this awesome party theme.

So I decided I would make a valiant attempt at Harry’s favorite dessert- the treacle tart. This came with it’s own problems, as I could not find treacle in my local markets, and having never tried a treacle tart, I didn’t have much to gauge it by. There were several recipes online, all of which, thankfully, used golden syrup, a British product that tastes like a cross between honey, agave, and corn syrup (any of which, or a blend, would probably be OK as a substitute). One called for eggs, which I did not use – I expect the result would make this more like a pecan pie without pecans. The recipe also calls for bread crumbs, to varying degrees – I think next time I would use less. Most also called for a frozen pie crust or a shortbread crust – my recipe is below, but feel free to substitute your favorite crust. One with ground pecans or almonds might be good.

The overall flavor is certainly what I would consider British. It’s a bit heavy, and a bit bland, but very homey. This is definitely one to serve WARM, and with ice cream or crème fraiche, or maybe lemon curd or custard (it does dry out pretty quickly). I might add fresh ginger instead of ground, and perhaps a touch of ground clove for interest. Americans will likely find it a bit odd, but I can absolutely see how, after a long wet ride across the lake, a glare from Snape, and a fight with Draco, Harry would treasure this humble and comforting, dead-simple dessert. So for those of you die-hard fans like myself, give this a try – it’s super simple to make, a great base for more exotic toppings, and a perfect accompaniment for butterbeer! Draco dormiens nunquam titillandus!


Treacle Tart
Cobbled together from about.com and Not So Humble Pie (at blogspot)

PASTRY
8 oz plain flour
1 oz fine sugar
4 oz very cold unsalted butter
1 tsp. vanilla extract
Cold water to mix

FILLING
8 oz golden syrup
1 T. molasses
6 oz fresh white breadcrumbs*
zest of a large lemon
2 tablespoons lemon juice
1 tsp ground ginger

TOPPING
Egg wash

EQUIPMENT
9” tart pan with removable bottom

DIRECTIONS
For the crust:
Mix the flour and sugar with a whisk or your fingers until combined. Cut butter into small pieces and combine with dry ingredients using a pastry cutter or your cold fingertips. When the mixture looks like crumbly peas, mix vanilla with 3 tablespoons of ice water and mix in gently. If dough holds together when squeezed, you’re done – if not, continue to add water a tablespoon at a time. Once dough is cohesive, briefly knead into a disc, wrap in saran wrap, and refrigerate for 30 minutes to an hour.


Remove dough from refrigerator and roll out to tart pan’s size. Press into tart pan and roll rolling pin over the top to remove excess (feel free to shape into a Sorting Hat or pumpkin to put on top). Refrigerate while you make the filling.


For the filling:
In a small saucepan, warm the golden syrup and molasses together until smooth and viscous (do not let boil).


Add ginger and lemon zest and juice, and mix to combine. Add in bread crumbs and allow the mixture to saturate.


Once the bread crumbs have taken on the juices, scoop into the prepared crust to cover the bottom (it will not expand in baking), and pop into a 375 degree oven for 20 minutes.


Cool very briefly on a wire rack (no more than 5 minutes), then top with something yummy and serve with pumpkin juice or a goblet of Rosmerta’s best mead.